This is a hunting arrow that my old mentor taught me how to
make. Some people call it a Swiss arrow;
others call it a Yorkshire arrow. He always called it a throwing arrow, so
that’s how I refer to it. The throwing
arrow works on the same principle as the atlatl, but instead of using a solid
stick as a dart thrower, you use a piece of string.
The arrow or dart is much like a regular arrow except it is
a little larger in diameter and a little longer. The arrow that I am making here is about 3/8
inch on the large end (back), 5/16 inch on the small end, and around 36 inches
long.
So, let’s make a throwing arrow. The first thing that we will need is an arrow
shaft. I found a nice straight shoot of
Yaupon Holly that I cut for my arrow shaft, but any good solid, straight wood
will do. If you don’t have access to any
wild material, you can buy a 3/8 inch dowel rod at the hardware store. After removing the bark, I let the shaft dry
of a couple of days so that it wouldn’t be too sticky. I did a little gentle hand straightening to
take a couple of small kinks out of the shaft.
Pictured below: Yaupon Holly arrow shaft.
Next is the fletching.
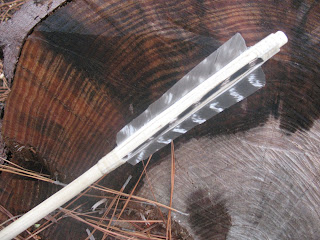
I split a couple of wild turkey wing feathers and cut them to length for
fletchings. I am going to use four
fletchings on this arrow. Don’t ask me
why. That’s the way my mentor did it, so
I’m just continuing the tradition. I’m
sure it will work just as well with three fletchings. Pictured below: Turkey feather fletchings.
After the fletchings are cut, they need to be attached to
the shaft. In this case I used glue and
deer sinew to attach the fletchings.
After the sinew is dry you can cut the fletchings to shape. Here’s a hint, don’t leave the fletchings too
tall or they will slow down the speed of your arrow, kind of like a floofloo
arrow. Pictured below: Two views of the fletched arrow.
Because I am going to use this arrow for target practice I
attached a commercial field point to the front.
For actual hunting you would want to knap out a nice broadhead from
flint or glass. Pictured below: Field point attached to front of arrow.
Now the last step.
Come down about an inch below the front of your fletchings and cut a
notch in the shaft. The notch should be
cut to a depth of little less than half way through the shaft. The front side of the notch (the side toward
the front of the arrow) should be straight up and down. The back side of the notch should be sloped
back toward the fletchings. The picture
below gives a good illustration of how the finished notch should look.
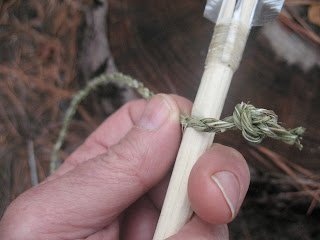
Now you need a string to throw the arrow with. I twisted one up out of yucca fiber, but a
piece of para-cord or any other similar size string will do. The string needs to be about one-and-a-half
times the length of the arrow. You will
need to tie an overhand knot in each end of the string.
These directions for attaching the string to the arrow are
for a right-handed person:
1. Hold the arrow in front of you in right hand with the
notch facing you.
2. Lay the knotted end of the string into the notch from the
left with the knot ending up about 1/8 inch to the right of the notch.
3. Put your left thumb on top of the string in the notch to
hold the string in place.
4. Using your free right hand, wrap the string in back of
the arrow and then pass it over the top of the string between the arrow shaft
and the notch.
5. Pull the string tight in order to lock it in place in the
notch.
6. Use your left hand to keep the string tight while you
wrap the loose end of the string around your right hand two or three times.
7. Now pull your right hand to the front of the arrow (keep
tension on the string so that it doesn’t fall out of the notch).
8. Grip the arrow shaft between the thumb and fingers of your
right hand about three inches back from the point. You may have to wrap or un-wrap a little more
string around your right hand in order to have your hand in the right place on
the shaft. You are now ready to throw.
This process sounds kind of complicated, but it really only
takes about three seconds to get the string on the arrow and have it ready to
throw. The pictures below are probably
easier to understand than the written explanation.
Throwing the arrow just takes practice. You want to throw it with an overhand motion,
not side-arm. Your arm should be fairly
straight but not locked at the elbow. I
find that I get the best results if I just forget about the string and act like
I’m trying to throw the arrow with my hand; and then keep my throwing hand
moving in a follow-through that ends by my knee. Pictured below: Throwing the arrow.
I can throw one of these arrows about 40 to 50 yards, but I
have to admit that my accuracy is not that great. It’s like anything else; practice makes
perfect, or at least better.


1 comment:
A great family project! Thanks so much for all the amazing info you post. I've been reading for awhile now and am enjoying passing the knowledge onto my boys.
Post a Comment