Pages

Sunday, June 3, 2012

How to Sew with Real Sinew


Many hobbyists and re-enactors use artificial sinew (waxed Dacron) to sew together bags, clothing, and other items.  It's hard to tell the difference between artificial sinew and real sinew after the sewing is done, and the artificial stuff is sure more convenient to work with; but this is a blog about survival and primitive skills, and you don't find waxed Dacron in the wilds.  So in this post I'm going to show you how to sew with real sinew.  The project I'm working on here is a set of straps for the pack basket that we made in the last post.  By the way, if you try this kind of sewing you will gain a quick understanding of why things like steel awls, metal sewing needles, and linen thread were such popular trade items with the Native Americans.

The Pack Straps

We could just twist up some rawhide or yucca fibers into large cordage to make our pack straps, but I know from experience that narrow straps are tough on the shoulders.  I'm going to make some straps for my pack basket out of brain tanned elk hide, with the finished straps being about an inch and three quarters wide.  Straps this wide that are made from a double layer of soft leather will be a lot easier on the shoulders.  Here's the procedure:

First cut the straps about three and half inches wide, then fold them in half lengthwise.  This will give a double layer of leather and a finished strap that is about one and three-quarters inch wide..  

Now it's time to prepare the sinew.  You want the longest sinew possible so that you don't have to constantly be tying off an old thread and starting a new one.  In this case we will use an elk loin sinew.  This will give us sinew threads that are about two feet long.  Pictured below: Elk loin sinew with dollar bill to show scale
 When you first strip off a thread of sinew it will be kind of fuzzy and rough.  Pictured below: Freshly stripped sinew thread
 Run the sinew through your mouth and moisten it with saliva.  This will soften the sinew and smooth it out.  Set the sinew aside to dry for a minute.  Pictured below: Moisten and dried sinew thread

When you have your sinew prepared, it's time to take your awl and start punching holes in the leather.  It's a waste of time to punch more than two or three holes at a time.  The holes in the leather will shrink back up and make it hard to thread the sinew through, so it's easier to punch the holes as you go.  Pictured below: Using an awl and hammer-stone to punch holes in the leather

You don't need a needle to sew with sinew.  Just leave the first inch or two of the sinew dry and stiff and that will serve as your needle.  Pictured below: Dried sinew "needle"

Chew lightly on the rest of the sinew to soften it and then tie a double knot in the tail end of the sinew.  Pictured below: top, chewing sinew: bottom, knot in the tail end of the sinew

Start sewing by running the sinew up from the inside through one layer of the leather.  This will hide your knot in between the layers.  Go to the second set of holes and sew down through both of them, then back to the first holes and up through both of them, then once again down through the second set of holes.  This makes your first stitch a double stitch with the knot hidden between the layers of leather.

Now you can start punching and stitching down the length of the strap.  Pictured below:  Sinew "needle" sticking through pre-punched holes in the leather

When you run out of sinew, you will have to start a new piece.  I have never found any definitive information on how this is done, so I have tried several different methods.  I tried twisting the new sinew and the old together.  Didn't work.  The wet sinew would pull apart.  I tried tying the new sinew to the old.  Didn't work.  Again, the wet sinew would slide out of the knot.  If I let it dry first, the knot would be hard to pull through the holes, and you never knew if the knot was going to end up showing on the outside of a stitch.  So, this is what I came up with.  I don't know if it's historically accurate, but it works for me.  First I tie a knot in the old sinew so that the knot will be in between the layers of leather. 
 Then I take my new thread, knot it, back up one hole and start the thread so that the knot is in between the layers of leather. 

I then continue my sewing.

When you get to the end of your sewing, do a double stitch pulling the thread out between the layers of leather. 
Tie a knot in the sinew.
 Cut off the excess, and use the point of your awl to push the knot back up between the layers of leather. 
You should now have a nicely stitched piece of work with no visible knots. Pictured below: top, row of stitching; bottom, the finished pack strap.

In my next post we will attach the straps to our pack basket, and finish the basket out.

Monday, May 28, 2012

Make a Rawhide Pack Basket


This is a primitive skill that my old survival mentor taught me.  He said that was how some Native Americans made their pack baskets.  I've never seen one in a museum and I can't find any documentation on the internet, but it does make a dandy pack; very light-weight, very strong, and comfortable to carry.  This would make a great trekking pack for a buckskinner, longhunter, or mountain man re-enactor.

The basic parts of the pack are two wooden hoops with rawhide netting made like the target hoop from my last post, and one wooden hoop without netting.  Of the two netted hoops, one should be pretty near round and the other should be more oval shaped.  The un-netted hoop should be oval shaped.  Pictured below:  The basic parts of the pack basket
To assemble the pack, take some wet rawhide and lash the two netted hoops together as shown below.

Now take the un-netted hoop and lash it to the two netted hoops as shown below, then set the whole thing aside and let it dry overnight.  Pictured below: Un-netted hoop attached
When the pack has dried out take some more wet rawhide and net in the sides of the pack.  To do this you follow the same basic procedure that you use to net the hoops.  Pictured below:  One side of the pack basket netted in (the other side is secured with a rawhide thong to keep the drying rawhide from pulling the basket lopsided)
Net in the other side and let it all dry.  You may want to add a twisted rawhide handle to the top of the pack basket to make it easier to pick up.  And here's your finished pack basket:
Now we need some straps for the pack.  In my next post I will show you how to make a set of pack straps that are sewn together with real sinew using the old-time method of sewing.

Wednesday, May 23, 2012

Make a Target Hoop for Archery Practice


This is a fun project all on its own, but it is also the first step in making a primitive backpack.  After we have made a target hoop I will do a post on how to take two of them and turn them in to a very effective backpack.

Target hoops were used by Native-American boys to practice their hunting skills.  The hoops were rolled across the ground or tossed up into the air, and the boys would try to shoot an arrow through the hoop.  The target hoop is basically a hoop made of wood with a rawhide netting woven into it.  It looks very much like what most people know as a dream catcher.  Pictured below: Dream catcher and target hoop, look a lot alike don’t they? 

Since I have never seen any historical documentation of dream catchers prior to 1900, I have often wondered if some white man didn't see a target hoop hanging in a teepee somewhere and when he asked what it was he was spun some yarn about how it was there to catch bad dreams.  Who knows?  Anyway, this is how you make a target hoop.

First we'll make the wooden hoop.  For this we will need a nice flexible sapling.  Willow was commonly used for this purpose, but any kind of sapling will do.  Since we are going to eventually turn this into a pack, we will make our hoop a little larger than the traditional ten or twelve inch target hoop.  Cut a sapling that is about as big around as your index finger at the base and about five feet long.  This will give you enough length to make a hoop that is about sixteen inches in diameter with a foot of overlap.   You can leave the bark on or take it off.  Since I'm going to keep this one for a while I'm going to go ahead and take the bark off.  While the sapling is still green and flexible, go ahead and bend it into a hoop and tie it off.  If you have time to let it dry for a few days, that's good; but it's not totally necessary.  Pictured below:  Pealed sapling tied into a hoop

Now we need to weave in the netting.  You can make the netting out of store-bought cordage or hand-made cordage, but the traditional material was rawhide.  I like to use rawhide because it is very strong, and since it shrinks as it dries, it makes a nice tight hoop.  Check my post of 12/19/2011 for information on how to make rawhide.  Pictured below:  Rawhide that is being cut into a long thong.  Notice how I spiral around the edge to get the maximum length out of a relatively small piece of hide
After you have cut you rawhide lacing, soak it in water for a few hours to soften it.  The rawhide will shrink when it dries and make your hoop tight and sturdy.

To begin the netting tie one end of your rawhide lace to the hoop and then make a series of fairly tight loops all the way around the hoop.  When you get back to where you started wrapping, drop down and keep going.  You will be creating a series of diamond shapes as you continue lacing.  The series of pictures below will show you how to lace the rawhide better than I can tell you with words.

First course close-up

First course completed

Second course

Second course finished

Four courses finished

As you continue spiraling around you will notice that the diamonds get smaller and smaller.  When the diamonds get too small you can do a row where you lace the thong through every other diamond.  Then go back to lacing every diamond.  Pictured below: On this row I am skipping every other diamond

When you get to the middle of the hoop, tie the thong off, and set the whole thing aside to dry over night.  Pictured below: Finished target hoop

 If you are going to make a backpack, go ahead and make a second target hoop the same as the first one, but make the second hoop a little more oval in shape.  Pictured below:  The two hoops that we will use to make our back pack


Friday, May 18, 2012

Make a Honeysuckle Basket


Very, very seldom is anyone ever caught in a long-term survival situation.  A Robinson Crusoe scenario you might call it.  Most rescues of individuals lost in the wilderness occur within seventy-two hours.  So being able to make storage containers or gathering baskets is not a really important survival skill.  It might be a fairly important skill in a post apocalyptic world where isolated communities might have to provide everything, including containers, for themselves.  At any rate, basket making is a fun and relaxing skill and it does have some usefulness around the homestead.  A nice basket is handy when harvesting produce from the garden or if you are out gathering wild berries or fruits.  So let's learn how to make a simple basket.
 Basket making is one of man's oldest household skills.  Baskets were manufactured for thousands of years before the development of ceramic pottery making.  Some cultures took basket making to such a level that they could actually weave watertight baskets.  I certainly don't have anywhere close to that level of skill, but I can weave simple baskets to use for gathering and storage; and one of the simplest types of baskets to make is the woven honeysuckle basket.  Give this skill a try and you will probably find it fun and easy to do.

First you will need to gather the raw materials.  Honeysuckle is easily recognizable by the small white flowers that grow all over the vines in the spring.  Every kid I know of has pulled these flowers to suck the sweet nectar out of them.  Don't worry about sending honeysuckle into extinction by pulling down the vines.  I have been pulling them for thirty years on my farm and, if anything, there are more of them now than there were thirty years ago  I gather vines of all sizes and sort them according to diameter after I clean them.  Pictured below: Honeysuckle vines
 After you have gathered a bunch of vines, you want to run your hands down them to strip of the leaves and flowers.  If the vines fork or have side shoot can cut these off and save them to use also.  After I have a long vine cleaned I generally roll it up into a coil and set it aside to dry.  If you try to use the vines when they are too green, they may snap due to the pressure of internal fluids.  You can use green vines; you just have to be extra careful. Pictured below: Cleaned and coiled vines
If you want to remove the bark from the vines you can peel it off pretty easily from the fresh cut vines.  If the bark has already set you can toss the vines into a big pot of boiling water and boil them from about ten minutes.  Take them out, let them cool, and most of the bark will peal off easily. 

The dried and coiled honeysuckle vines will keep for years, so you may use them at anytime.  Before you use the vines it is a good idea to soak them in water for a couple of hours so they will be pliable.  Pictured below: Vines soaking in water
Now take your freshly soaked vines and let's start on our basket.  We're going to make a gathering basket that is about ten inches across at the top and eight or ten inches deep.  The first thing that we need to do is lay out the ribs (called "warps" in basket making) of the basket.  You will need to select some of the larger and straighter pieces for the warps.  These should be from 3/8 to 1/4 inch in diameter.  You will need three pieces that are about 30 inches long and one piece that is about 18 inches long.  You see, to make a woven basket you need an odd number of warps (in this case we'll have seven).  If you have an even number of warps you will end up going over and under the same warp with each layer of your weft (this is the vine that you weave around and around the basket).  This sounds a little confusing, but you'll see right away what I'm talking about.

Take the three longest warps and lay them down crossed in the center.  Take the short warp and lay it down in the "V" formed by two of the long warps.  Lay the short warp so that it has about 15 inches on one side of the crossed warps and about 3 inches on the other side. 

Now take a piece of string or a strip of yucca fiber and tie all of the warps together in the center.  Wrap the string around so that it keeps the warps spread out in an even spoke-like pattern.  Pictured below: top, Warps tied together; bottom, close-up of warps tied together
 Now we can start weaving in our weft.  Select the longest piece of honeysuckle that you have and start your weaving where the warps cross.  Push the weft down under one warp and then take it over the next warp.  Go under the next warp and over the next warp.  Continue weaving around and around the basket.  Notice that because of the odd number of warps that your weft will go under a warp one time and then over the same warp the next time around.  Keep your weft pushed in tight to the layer below it so that you don't have gaps in the wall of the basket.  Pictured below: Weft woven around warps
 When you've worked your weft out about two inches it is time to add in six more warps before we start turning up the sides of the basket.  To do this you will need six more pieces of honeysuckle that are about fifteen inches long.  Push one of the new warps in between each of the existing warps except for one.  Remember, you need an odd number of warps so that the weft goes over a warp one time and under it the next.  It's a little tricky to keep the new warps in place as you start working the weft around, but after you've made a couple of passes they will stay in place just fine.  Pictured below: New warps pushed into place

Since we are making a bowl shaped basket we don't have to make any sharp turns with the warps.  Just bend them up gradually as you work and the rising weft will hold them in place.  When your weft runs out just let it end so that it is in back of a warp (inside the basket), back up about two warps, and start a new weft.  Continue weaving the weft until the basket is as tall as you want it.  Pictured below: top, turning up the sides of the basket; bottom, finished weaving and ready to finish out the rim
 When you have the basket completed to the height that you want, it is time to finish out the top.  To finish the top you will need to trim off the excess portion of the warps and bend the warps down to insert them into the holes next to other warps (this will become more clear in a moment).  The point is that we are going to be bending the warps rather sharply, and since they are pretty dry at this point, the may snap.  To prevent the warps from breaking, it is a good idea to soak the basket in water for an hour to make sure that the warps are soft and pliable.

Now that the warps are soft and pliable we can finish out the top.  Select any warp (we'll call this warp A) and bend it over to the right.  Pass it in front of the warp that is just to its right (we'll call this warp B) and pass it in back of the next warp (we'll call this warp C).  If you’re making a basket without a handle continue weaving down the warps all the way around the basket until you get to the last two.  Since there are no warps left to weave these last two in back of, you just bend these down and insert them down into the holes of the warps next to them.  Pictured below: Close-up of rim showing how the rim looks after weaving down the warps
 If you want to make a handle, leave two warps that are on opposite sides of the basket standing up.  Weave the rest of the warps down as above.  Now take the two standing warps and bend them down toward each other.  Insert the ends of these two warps down into the hole next to their opposites.  You should now have a handle of two warps that lay side-by-side.

Now take a long vine and shove one end of it through the side of the basket just below the rim and right next to the handle.  Pull half of this vine through the basket wall and then fold it together.  You should now have a double vine that is secured beneath the rim.  Take this vine and spiral it tightly around the handle until you get to the opposite side of the basket.  Poke the ends of the doubled vine down into the holes next to the handle warp.  Shove them down pretty far so that they will stay in place.  Pictured below: Completed basket with handle
 You've now completed a simple woven, honeysuckle basket.  Time to go out and gather some wild berries.   


Sunday, May 13, 2012

When It Comes to Survival, Don't be a Purist

When I'm doing wilderness survival projects, I usually try to do them as if I have no tools other than my pocket knife and no raw materials other than what I can forage in the wilderness. I do this so I can master skills in a worst case scenario; sort of a "naked into the wilderness" mind-set. But, trust me, if I ever find myself in a true survival situation; I will use anything and everything that I can find to survive.

Jesus said that "the poor shall be with ye always." He could have easily said that "trash shall be with ye always." There is hardly a place left in the world where man has not left his debris. I recently read that they were having a clean-up day on Mount Everest to clear away all of the trash and discarded oxygen bottles that climbers have left on the mountain. Mount Everest for Pete's sake!!!! If the top of Mount Everest is trashed out, what part of the world is free from liter?

What I'm getting at is that even though you are lost in the wilderness you will probably come across items that have been discarded by other humans. If you find something that you can use to help you survive, use it. Let me give you an example. This wasn't really a survival situation, but it will illustrate my point. A friend and I were back-packing in Colorado some years back. We had brought plenty of food with us, but we hadn't brought any fishing gear. We were up in the mountains about twenty miles from the closest town, and we were hiking along next to a beautiful mountain stream. The stream was teaming with trout, and we were sick of freeze-dried food, but as stated earlier we had no fishing gear. Jim knew that where there were trout, there had to have been trout fishermen, and sure enough, in no time he found some broken and discarded fishing line that still had a hook on it. Jim turned over a rotten log, located a few grubs, and using his scavenged equipment as a hand line caught three nice trout. Trout for dinner thanks to someone else's trash. Here are just a few examples of how you can turn trash into valuable survival equipment:

Beer Bottles

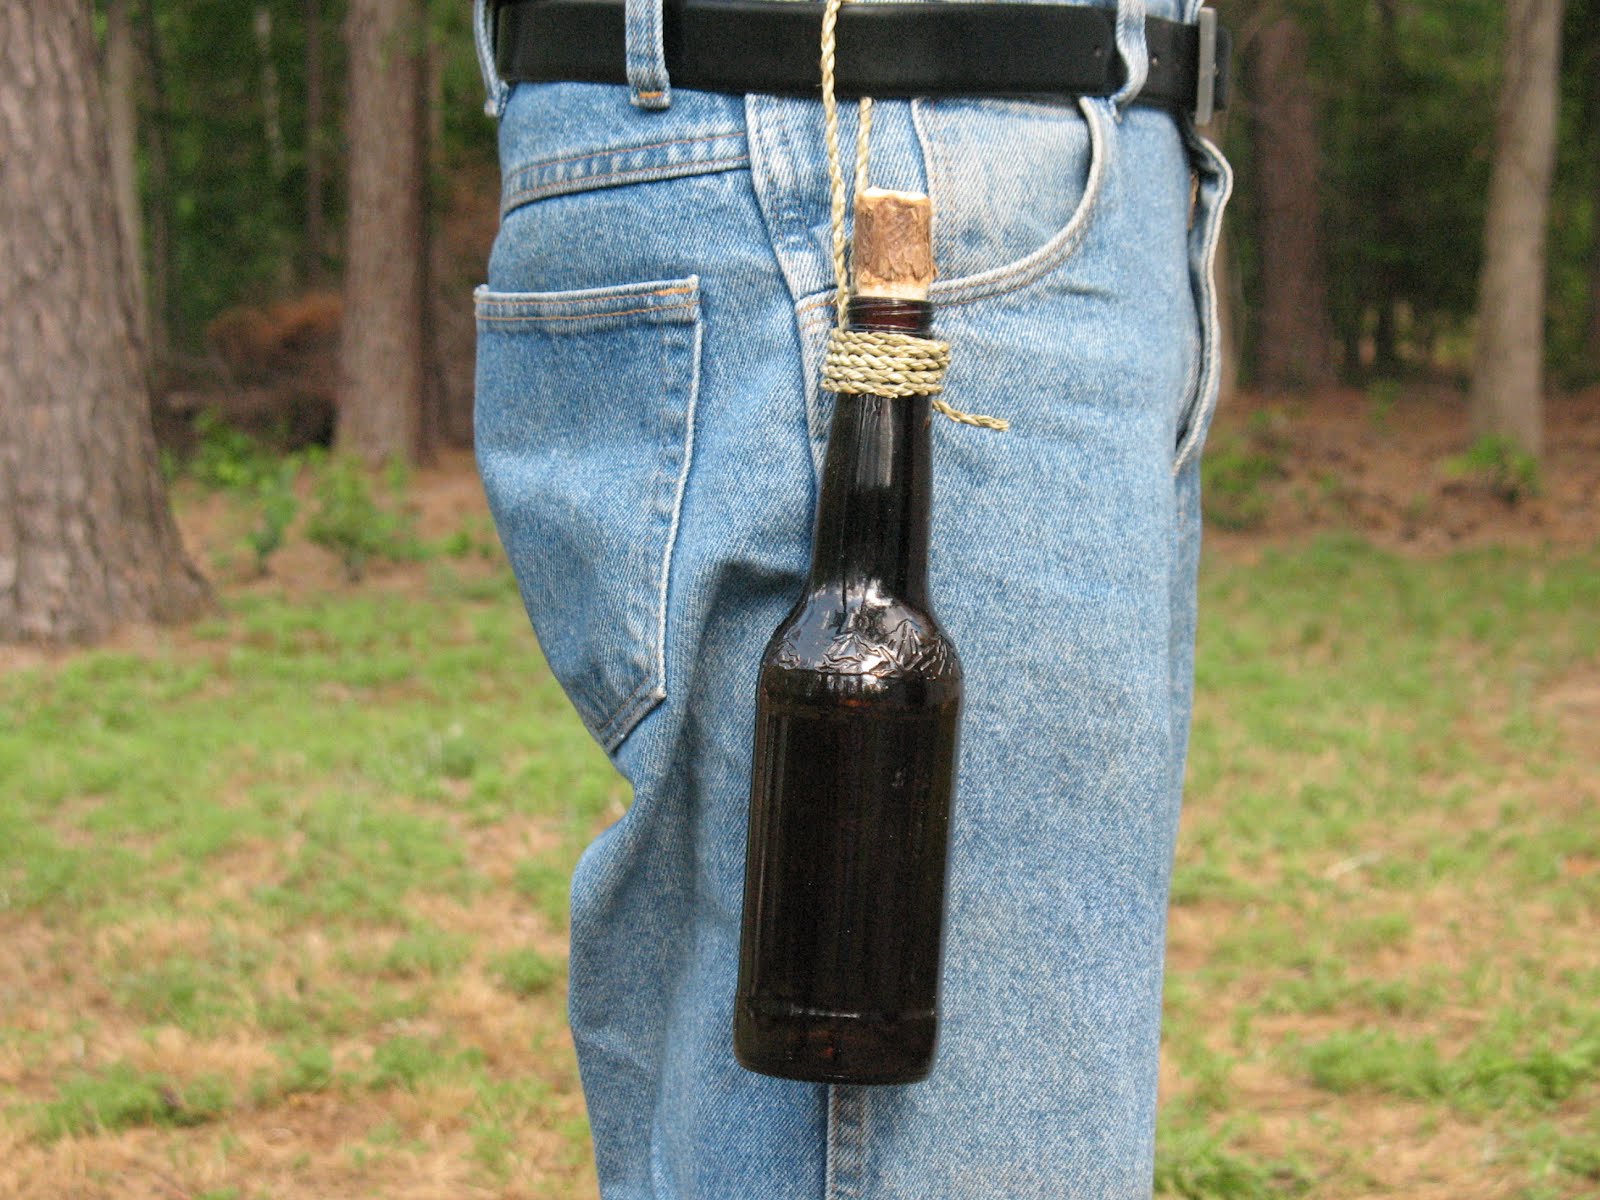
Here I've carved a wooden stopper, attached a piece of yucca cordage, and made a very handy survival canteen out of a discarded beer bottle.
The bottom of a broken beer bottle can be used to make an effective arrow point.
Broken glass can also be used for skinning game, or it can be used as a scraper for making arrows and etc.

Plastic Bottles

Plastic bottles can be used to store and transport water. Two-liter bottles can be turned into effective minnow traps.
Old Cans An old can and a piece of rusty wire can make a serviceable cook pot. You can boil water in a can to purify it for drinking or use the can as a container when gathering wild edibles.
Remove the pull tab from an aluminum drink can and attach a fishhook to it to make an artificial lure.

CD’s

Much has been made of using an old CD for a signal mirror to signal aircraft. This can be done, but a CD is far less efficient than a mirror. Never the less, a CD is far better than nothing at all. Pictured below: top, a CD and a real mirror; bottom, the light that they produce when shone on the side of a house fifty feet away. CD flash is on the left, Mirror flash on the right.
Plastic Bags

These things are everywhere. When I go canoeing I see them draped in trees where the high water has left them. Plastic bags can be used hold wild plants as you gather them. If there is a chance of rain, you can gather dry fire tinder and store it in a plastic bag to keep it dry. A plastic bag makes a good emergency rain hat. Fashion a hood out of a plastic bag to help cut the wind and retain heat that radiates off of your head. Plastic bags stuffed with cattail down or shredded cedar bark can be worn over the hands as emergency mittens to prevent frostbite. A large plastic bag can be used as a poncho, a ground cloth, or an emergency tarp. A plastic bad can be sealed over the live foliage of a tree limb to act as a mini-solar still for collecting water. Please note that you don’t get much water from one of these, so ties on as many as you can find. Plastic grocery bags can be twisted up into light-duty cordage. Pictured below: Four feet of cordage made from one grocery bag
Remember, your mind is your most important survival tool. Learn to think outside the box, and use anything that you can find, natural or man-made, to help you survive.

Tuesday, May 8, 2012

Preparedness, Survival, and Primitive Skills

Since I have made about a hundred and fifty posts on this blog over the past couple of years, I guess it's about time to clarify what this blog is about. The Sensible Survival blog is really about three different and distinct areas; preparedness, wilderness survival, and primitive skills. Preparedness Everyone should be prepared for disasters, natural or man-made. The posts on preparedness are about being ready for things like temporary power outages, unemployment, natural disasters, biological accidents or attacks, civil disorder, or the complete breakdown of society. The social order may endure forever, but everybody's power will go out sooner or later, so be prepared.
Survival A significant number of people are faced with survival situations every year. Hikers get lost. Hunters on ATV's breakdown far from their camps. Motorists get stranded on lonely roads. Light planes crash. Skiers get stranded by snow storms. Etc., etc., etc. Most of these events end happily with the lost individuals being rescued within a day or two, but everyone should be familiar with the basic skills needed to survive in the wilderness for at least 72 hours. Preserving body heat, building a fire, finding drinkable water, and signaling for help are skills that can save your life in a bad situation.
Very rarely, individuals are stranded in the wilderness for weeks or months. In a situation like this, additional skills such as wild plant identification, making animal traps, cooking without utensils, making cordage, making a survival bow and arrows, and how to land navigate can help insure survival.
Primitive Skills The rarest occurrence of all is what I call a Robinson Crusoe scenario, a situation where an individual has to live for many months or even years in the wilds. This is the situation where primitive skills would come into play. How to make a fine hunting bow, making baskets and pottery, tanning animal hides, and drying meat are examples of primitive skills that you would need in a Robinson Crusoe scenario.
So, primitive skills are probably the least important skills that I blog about; but here's the thing. For a certain type of individual, like me, and maybe like you, primitive skills are fun. It's like a hobby that might possibly have a real world application at some point, but probably not. Be that as it may, I enjoy making fine hunting bows, I enjoy making baskets, I enjoy making stone tools, and I enjoy brain tanning hides; and I will continue to post about these activities along with my posts about preparedness and survival. Hope that clears things up a little.