
Let me describe a cane arrow before we start gathering materials. A cane arrow has a cane shaft that is about as long as the distance from you armpit to the tip of your middle finger. Inserted into the front of the cane is a hardwood foreshaft that goes down into the cane about two inches and extends out from the cane about six to eight inches. This hardwood foreshaft may be sharpened to a point, or it may be notched and a metal, stone, or bone point attached to it. The rear of the cane is notched to fit your bow string. Feathers are tied to the cane using natural fiber, string, or animal sinew. If you can't find any feathers you can actually use leaves as fletchings. You can make arrows without fletchings (the Bushmen don't use fletchings on their arrows), but you will have to experiment to get the right balance between cane and foreshaft.
So, let's build an arrow. The first thing is to select the best canes that you can. This will save you work in the long run. Select canes that are as strait as possible. Do not select canes that have short joints. Look for canes that are not too tapered. The large end of the cane should be no larger in diameter than your little finger. Cut your canes a few inches longer on each end than you will need them. Canes that are not straight (which is nearly all of them) can be straightened by heating gently and bending them straight. Don't burn the cane. Hold it over coals rather than a flame, and keep the cane moving and turning so that it doesn't burn. Pictured below: Unstraightened piece of river cane.

When you have the cane as straight as you can get it, let it cool, then use your knife and/or a sandstone rock to smooth down the joints. You are now ready to cut the cane to length. First we'll cut the front end where the foreshaft will be inserted. You want the larger end of the cane to be the front of the arrow. Cut the cane so that you have about two inches of cane in front of the last joint. This way when you insert the foreshaft, it will rest on the cane joint. This will help to keep the foreshaft from being pushed down into the cane when the arrow strikes its target. The easiest way to cut the cane is to run you knife blade all of the way around the cane several times in order to score a groove into the cane. The cane should snap off cleanly when you bend it at the score mark. Pictured below: Straightened cane with joint smoothed down.

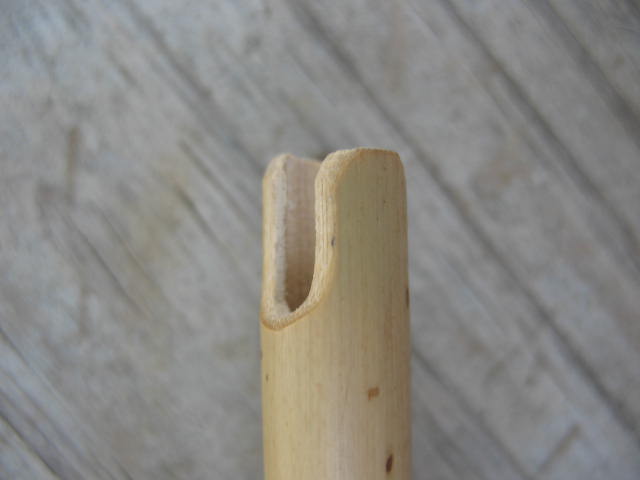
Now we need to cut of the back of the cane so that we'll have the proper length shaft. Stick the front of the cane (the end that you just cut) up under your armpit. Now extend you arm straight down. Where your middle finger touches the cane is the proper length. Cut the cane here. To cut a nock for your bowstring, take your knife and slice into the cane about a half inch from the back and shave a little off of both sides of the cane. Use your knife point to clean out the resulting U-shaped nock. Pictured below: Finished nock.
The foreshaft can be any straight piece of hardwood that is eight to ten inches long and about a quarter inch in diameter after the bark is removed. I usually use huckleberry, yaupon holly, or privet; but anything will do as long as it is solid and strong. Remove the bark, trim one end down so that it will slide all the way down into the first joint of the cane, and sharpen the other end to a point. You can fire harden the point by holding it over hot coals. Don't char the point; you just want to drive the moisture out of it to make it harder. You can just stick the foreshaft down into the cane, but I prefer to put a little heated pine sap on the foreshaft and glue it down into the cane. When the pine sap hardens it will hold the foreshaft securely in the cane. Pictured below: Foreshaft glued into front of cane.

In a survival situation any kind of feathers that you find in the woods will make a good fletching, but if you are just making arrows for practice you need to make sure that you are using legal feathers. A hawk or vulture feather that you find laying in the woods can end up costing you $2000 in fines if a game warden gets involved. I make sure my feathers are legal by buying them at the hobby store. You can buy chicken, duck, pheasant, and other feathers in packages.
The purpose of the fletching is to put some drag on the back of the arrow. With the back wanting to go slower than the front, the arrow will travel in a straighter course. Nicely split and glued feathers look nice on an arrow, but they are not at all necessary to make the arrow perform properly. As you can see from the photo below, I have taken two whole feathers, trimmed some off of the back, and used yucca fibers to tie them, laying flat, on opposite sides of the shaft. I put a little melted pine sap on the yucca fibers to hold them more securely in place. Pictured below: Fletching tied on with yucca fiber and sealed with pine-sap glue.

This arrow will now fly straight, and should be capable of killing small game. Total time on this arrow, not counting gathering materials, is about an hour. Pictured below: Finished green-wood bow and river-cane arrow.


No comments:
Post a Comment