Pages

Sunday, February 27, 2011

Primitive Fishing - Hooks and Line

This post is about my primitive fishing gear; not to be confused with my survival fishing gear. To me, when I say primitive gear, I'm talking about homemade stuff that I can make with some simple tools out of things around the old homestead. When I say survival gear, I'm talking about stuff that I make out in nature using only natural materials, and using my knife as my only civilized tool. So this primitive fishing gear is made from common items found around the house, and it is made with a few simple hand tools. Pictured below: Primitive hooks made from wire and nails. Some have barbs, some don't.

Let's start with a primitive hook. If you have a vise, a hammer, a small file, and a pair of needle-nose pliers; it is not hard to make fish hooks out of the right kind of wire. What is the right kind of wire? Well, it can't be too soft. If the wire is too soft it will straighten out when a fish starts fighting against it, and you will probably lose the fish. I have some wire that is fairly stiff that makes good hooks. If your wire is too soft, you can try heating the finished hook until it is cherry red and then quenching it in water. Sometimes this will harden the metal. Pictured below: Wire for hook making.

Steel nails can be used to fashion hooks, although sometimes nails are too hard. Again, you can do a little amateur blacksmithing by heating the nail until cherry red, then bending it, and hammering down the end for a barb. A lot of work for one fish hook. It will definitely make you wish that you had bought a few hundred ready made hooks. When I was a kid, we used to catch small fish on a bent straight pin. I haven't tried that in a few years (like 50) but it might be fun to try again. Pictured below: Nails for hook making.

So let's take some wire and make a hook. The first thing to do is to flatten out a small portion of one end of the wire. This is the part that we will file into a barb. The flattening and filing is hard to do after the hook has been bent, so we'll do it while the wire is still straight. Now put the piece of wire in your vice and use your file to shape the flat into a barb. Make sure that the point is sharp so that it will penetrate quickly and easily. The barb does not have to be large. In fact you don't have to have a barb at all. I have caught a lot of trout on barbless fly hooks, but if I'm fishing for dinner I would like to make as sure as possible that my hook stays attached to the fish that swallows it. Pictured below: Finished barb.

After you have the barb made, you can take your needle-nose pliers and bend the hook. After the hook is bent, use your pliers to cut the shank to length. Pictured below: Bent hook.

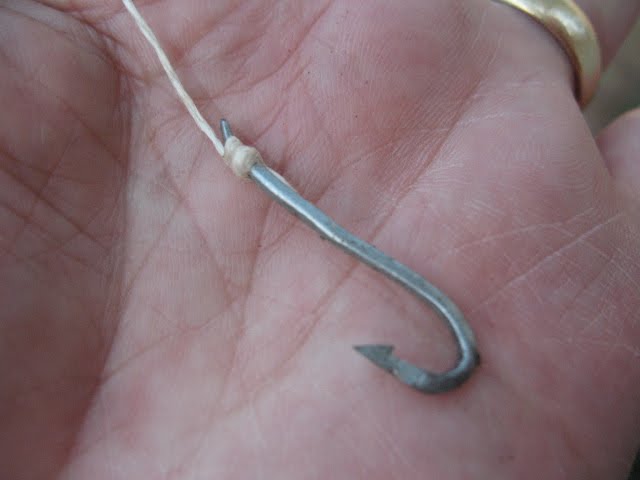
Do you need an eye on your hook? Not really. Many old time hooks did not have eyes. All you really need to do is wack the end of the shank a couple of times to spread the metal out a little. Pictured below: Shank flattened out and ready for line to be attached, and the finished hook.


Once you have a hook, you need a line. Almost any small string will do as long as it's strong enough to hold a fish. I usually use some small linen twine, but you could use nylon string, bailing twine, or even dental floss. If the string is too big you can unravel it into smaller strings. You will probably need about fifteen or twenty feet of line. Pictured below: Linen fishing line.

Your fishing line can now be tied around the shank using a snell knot, and the wide spot on the end of the shank will keep it from slipping off. Pictured below: Line attached to hook.

All we need now is a weight, a float, and some bait; and we're ready to go fishing.

Wednesday, February 23, 2011

My Primitive Two-Piece Cane Fishing Pole

When I was a kid we did all of our fishing with cane poles. The poles were probably about 12 feet long, but then I was only 6 or 7 years old so they seemed like they were as long as a football field. I remember clearly that it was a real pain to get through the woods and down to the pond with these poles. They would hang up on everything. I still have a cane pole that I use occasionally, but now I'm real up-town; I have a two-piece cane pole. The total length of my pole is about eight feet, and it is much easier to carry the two short sections through the woods. Pictured below: My two-piece cane pole.

To make a good cane pole, first you need to locate a stand of river cane. You will need to cut at least 2 canes. One cane should be about Half-Dollar size at the base, and the other one should be Quarter size at the base. You can use the canes green but they will be better if you set them up to dry for a few weeks. Pictured below: A nice stand of river cane.

Now comes the tricky part. You want to cut the canes so that the base part of the smaller cane will slide down into the top joint of the larger cane. This means cutting the top part off of the big cane, and the bottom part off of the smaller cane. The fit between the canes must be tight enough to hold the two canes together securely, but not so tight that you split the cane. If the fit is too loose a good fish may carry off the top of your pole. You can cut the canes so that you end up with any length pole that you want. I prefer a finished pole that is eight to ten feet long, but it's up to you. Pictured below: Two pieces of pole, pole joint about to be joined, and pole joint joined.


When you tie your line onto the pole I suggest that you tie the end of the line to the top joint of the bottom cane and then extend it up to make a second tie on the tip of the pole. This way if the tip of your pole breaks, or if the smaller cane is pulled out of the pole, you will still be able to save your hook and line, and maybe your fish.

Sunday, February 20, 2011

Fishing - Store Bought Equipment

Fishing is often overlooked as a survival food source, but it is really one of the most reliable and easiest ways to acquire high quality protein. The equipment needed to harvest fish is simple and inexpensive, and you can set out lines that will fish for you while you do other things. And hey, fishing is fun. Pictured below: My collapsible fishing rod.

For fishing equipment you need, at the very least, to have a pole, extra line, hooks, floats, and sinkers. I cut poles from a nice stand of river cane I know of, and then I put them up in the rafters of my workshop to cure. Line, hooks, floats, and sinkers come from the hardware store and the cost is next-to-nothing. This, and a few worms, is all you need to catch fish, but if you want to take fishing to the next level, buy yourself a rod and reel, a tackle box, extra line, hooks, floats, sinkers, some plastic worms, a nice assortment of artificial lures, a stringer, and some long nose pliers. I have a pretty good assortment of rods and reels that I have picked up at garage sales. A good tackle box doesn't cost much, and I keep my eyes open for sales on lures, plastic worms, etc. I would recommend that you buy several hundred fishhooks of various sizes. The fish hook is the most important part of the fishing set-up, and fish hooks make a good trade item if we should ever find ourselves in a barter type economy. Pictured below: Tackle box with fishing equipment.

Fishing with a pole or a rod and reel is a good way to catch a fish, but a trot-line is the way to catch many fish. A trot-line is a long string (usually nylon) that is stretched out underwater, or just above the water. Suspended from this string are short (2 to 3 foot) drop-lines with a baited and weighted hook on the end of each line. There are many ways to set a trot line. You can tie it off on both ends to fixed objects, you can tie off one end and put a drop-weight and a float on the other end, or you can put a drop-weight and a float on both ends. A drop weight can be made from anything that will sink. A coffee can full of dried concrete with an eye-bolt embedded in it makes a good weight. Empty bleach bottles make good floats. Trot-lines can be baited with anything. Worms, crickets, minnows, chicken livers, strips of beef liver, shrimp, or blood bait will all work fine. If you do set out a trot-line, be sure to run it every day and collect your catch. Pictured below: Store-bought trot line in package.

My next few posts will be about how to make and use primitive fishing equipment.

Sunday, February 13, 2011

Propagating Plants from Cuttings

I have recently begun propagating plants and herbs from cuttings, and I have been amazed at how easy this is. All you need is a pot, some potting soil or compost, some rooting hormone, and a cutting from the plant that you want to propagate. I have lots of plastic pots left from stuff I have bought in the past, I also have some peat pots, and some terracotta pots. I save the peat pots for starting vegetable plants from seed, and use the plastic and terracotta pots for cuttings.

Here's the method I've been using to start cuttings:

First, prepare the pots you will use a day or two before you take your cuttings. I generally use the little 3 inch by 3 inch pots. Fill the pots with potting soil or compost and press the soil down firmly. Don't pack it down; just compress it a little so that it's not loose in the pot. Place the pots in a plastic or metal tray and water them thoroughly. Some water will run out of the bottom of the pots into the tray because the potting soil will not absorb the water right away. Compost seems to absorb the water faster than potting soil. If you use potting soil you may have to water the pots a couple of times before the soil will become moist. Pictured below: Home made potting soil.

Second, find the plant that you want to propagate and take a cutting. You want to take a cutting of healthy, new growth off of the tip of a stem. Don't cut an older woody stem. I generally make my cuttings about 3 inches long. Remove any leaves from the bottom inch of the stem, and use your fingernail to scrape off the skin from the stem. You don't have to get every bit of the skin off; just drag your nail down a couple of times. Pictured below: Mint plant and cutting from mint.


Third, dip the cleaned portion of the cutting in water, then stick that portion down into the rooting hormone (a white powder). Tap the stem on the rim of the rooting hormone bottle to shake any excess hormone back into the jar. Pictured below: Cutting with rooting hormone.

Fourth, shove the cutting down into the moist potting soil up to the first leaf on the cutting. Press the soil lightly with your fingers to firm it in around the burried portion of the cutting. Pictured below: Potted cutting.

Place your cuttings a warm sunny place and keep the soil moist but not waterlogged. In a week or so you will begin to see some growth. Keep your cuttings in their original pots, or repot them if necessary, until time to plant. If they will be in the pots for a while, you may want to feed them with a little liquid fertilizer like miracle grow or maybe a manure tea. Pictured below: Rosemary, Thai Basil, and Lemon Mint Marigold all propagated from cuttings.

I've only just started doing this, and I've had about an 80% success rate; so it must not be too hard. So far I have propagated peppermint, Thai basil, rosemary, lemon mint marigold, lemon verbena, and roses. The lemon verbena was not successful, everything else lived and grew.

Tuesday, February 8, 2011

Making Glass Arrowheads - Part 2

Once you have roughed out the shape of your point, it is time to bring out the pressure flaker and start working down to your finished point. Most knappers do their pressure flaking with a deer antler tine or a piece of large guage copper wire mounted in a wooden handle. I personally use deer antler because that's what I've got. You'll also need a palm pad to protect your hand while you're pressure flaking. I use a piece of heavy leather, like belt leather. The pad is oval shaped and a little bigger than the palm of my hand. The leather needs to be flexible so that you can close the pad around the piece that you are knapping and hold it tight. Shown below: Pressure flaking tools.

When you pressure flake, you need to be fairly precise on where you remove a flake. Pressure flaking is how you will finish out the shape of the point and how you will straighten out the edge of the arrowhead so that it is sharp and will penetrate well. You want to try and make your flakes long so that you will not be left with a bulky point that's fat in the middle. The trick to pressure flaking is to push in and down on the edge. If you just push down you'll end up taking off a short flake and you'll have a point that's fat in the middle and then drops off at a too steep angle to the edge. Pictured below: How to take off flakes so that you keep the edge centered.


It takes practice, but that's why you're using glass, so you can practice. If you have a thin edge, pushing in and down may crush the edge rather than taking off a flake. You can prevent this by rubbing the edge on a piece of sandstone to grind it flat, and then using your pressure flaker to take off a flake. Turn your point up on edge and look at it frequently. You want the cutting edge of the point to run straight and to be centered. In other words, remember to flake both sides of the edge. Show below: Top: Improperly knapped edge; Bottom: Properly knapped edge.


The final step to finishing up your point is to cut the base notches for mounting the point on an arrow shaft. I made a special tool for cutting notches. I just drove a six penny nail into a wooden handle and clipped the head off of the nail. I use the same flaking motion to carefully cut the notches, and "shazam" I have a finished glass point. Pictured below: Finished point without notches, flaking notches, and finished point with notches.


By the way, I have since learned that Native Americans used glass, when they found it, to make some of their points. Ishi, the famous "last wild Indian" made beautiful points from broken bottles, so this is not just some modern invention. Shown below: Finished glass points.

So there you have it. A cheap readily available supply of knapping materials. Practice and enjoy. You'll find that your skills will improve, and you can move on to using that flint and obsidian that you've been afraid to bust into; or you may, like me, get hooked on knapping glass. Either way it's a great hobby.

Tuesday, February 1, 2011

Making Glass Arrowheads - Part 1


Note: This is a copy of an article that I had published in Backwoodsman Magazine a couple of years ago. I'm posting it here because I think it fits in with my last couple of blogs on survival archery equipment. Because of its length, I am making two posts out of it.

I have always wanted to learn how to flint knap but I have been plagued by a problem that many aspiring flint knappers face; there is no flint or obsidian where I live. For years I looked for flint whenever I was on vacation, always with very limited success. I bought a chunk of obsidian at a garage sale, and was able to work with it for a while, but it played out long before I learned much about knapping. The problem with being a beginner is that, at least in my case, I ended up with more waste than I did points. When you're producing more junk than good stuff, it's hard to justify paying money for a piece of rock. Pictured below: Flint and obsidian arrow points.

Finally, an acquaintance of mine, who is a first class knapper, turned me on to an inexpensive and virtually limitless supply of locally available knapping material. He told me to do my practicing on old glass bottles. When you think about it, it makes sense. After all, obsidian is nothing but a natural glass made by volcanoes; so instead of buying expensive natural glass, why not practice on cheap man-made glass. What a revelation! I dug through the trash for an old beer bottle and started right away. And you know what, my first glass point turned out pretty decent. Since then I've been hooked on knapping old glass bottles. I now refer to beer bottles as my East Texas Obsidian, but I didn't stop with beer bottles. I started keeping my eyes open at garage sales and thrift stores, and buying colored bottles. I've turned out some really nice green and blue points using old bottles. Pictured below: Colored bottles.

You learn pretty fast that some bottles are better than others, and some parts of the bottle will make better points. When it comes to beer bottles, I like to use what they call "bar bottles." These are the bottles that can be refilled, and the glass in them is a little thicker than the throw-away type bottles. One problem with bottles is that they are curved; and the smaller the bottle, the tighter the curve. This can be a problem if you're making a very large point. I've found that the best part of the bottle to use, especially on beer bottles, is the bottom. The glass on the bottom of the bottle is thicker and the curve of the glass is not as pronounced as the glass on the sides of the bottle. Another thing that I've learned is that the way the glass breaks is affected by the temperature. If the glass is cold it is more unpredictable. I like to set a bottle by my wood stove or by a campfire and warm it up a little before I break into it. You don't want to get it so hot that you can't hold it; just warm it up. Pictured below: Warming bottles by my wood stove.

When you've selected a good bottle and warmed it up, it's time to start breaking glass. Before you bust into the bottle you need to take some safety precautions. You should always wear safety glasses, not just regular glasses, but real safety glasses. Those little shards of glass fly like shrapnel, and an eyeball won't slow them down much, so wear your safety glasses. If you do a lot of knapping it's probably a good idea to wear a dust mask over your mouth and nose. Every time you knock a flake off, you're sending loads of nearly microscopic glass particles into the air. Breathing this glass dust into your lungs can cause really bad things to happen, just like breathing asbestos dust. So, now that you're all geared up, let's break some glass. Take your bottle and wrap it up in an old towel, lay it on a hard surface, and gently wack the side of the bottle with a hammer. Try not to smash the bottle, or you'll end up with pieces that are too small to use. I usually hit the upper shoulder of the bottle because I'm trying to keep the bottom in one piece. Pictured below: Breaking a bottle.

After you hear that satisfying crunch, unwrap the towel and see what you've got. With any luck the bottom will still be in one piece with a few jagged points of glass sticking up. If you weren't so lucky, no big deal, it's just an old bottle. Grab another one and try again. Pictured below: Bottom of bottle. This is what you are looking for to make your arrowhead out of.

Now it's time to do a little percussion flaking. Percussion flaking is where you use a rock or an antler billet to knock flakes off of the edge of your glass. Percussion flaking is not going to be pretty; it's just how you're going to rough out the shape of your point. Pictured below: Percussion flaking tools.

You'll want to start by knocking off those jagged points where some of the glass from the sides of the bottle is still attached to the bottom of the bottle. Be careful and try not to cut yourself. Remember, glass is sharp. Pictured below: Removing jagged points from bottle bottom.

When you have the side glass removed, it is time to start knocking the bottom into shape. Just strike glancing blows to the edge of the glass. Don't try to take off too much at one time. After you have knocked a series of flakes from one side of the glass, turn the glass over and knock flakes from the other side. Work your glass down into a triangle that is somewhat bigger than you want your finished point to be. Picture below: Percussion flaking the bottle bottom into a rough shape from which you can flake the finished point.


Next blog will be about how to pressure flake the rough point into its finished shape.