Pages

Saturday, June 25, 2011

My Fancy Atlatl and Dart

Pictured below are a several views of my fancy atlatl. Obviously it took more time to make and required better tools and materials than a simple survival atlatl. The body of the atlatl is made out of hickory. Pictured below: My fancy atlatl.

The grip and finger holds are made of brain-tanned leather. Pictured below: Grip with finger holds.

The dart hook on the end is cut out of elk antler and attached to the body with hide glue and sinew. Pictured below: Elk antler dart hook.

The rock weight on the atlatl is called a banner stone. It is attached with glue and sinew. The banner stone gives weight to the atlatl and imparts more energy to your throw. Pictured below: Banner stone.

My fancy dart is not much different from my improved survival dart. The main shaft is made of river cane which has been carefully straightened. The foreshaft is made of straightened huckleberry. Pictured below: Front of cane shaft and huckleberry foreshaft.

The point is about two and a half inches long and is knapped from flint. The point is attached with rawhide glue and deer sinew. Notice that the point has a rounded shoulder for easier removal from a game animal. Pictured below: Flint dart point.

This dart has three turkey feather fletchings attached with deer sinew, and the socket on the back of the dart has been reinforced with deer sinew to prevent splitting. Pictured below: Fletchings.

Next post will be how to use the atlatl and dart and a comparison of the atlatl and dart to the spear.

Wednesday, June 22, 2011

Make an Atlatl and Dart - Part 2

You can think of an atlatl dart as being either a small spear or a large arrow. Darts are generally constructed more like an arrow. That is to say they have a point on the front and fletching on the rear.

I make my atlatl darts out of river cane with a hardwood foreshaft. Select a straight piece of river cane that is about a half inch in diameter and four to five feet long. If the cane is not straight, you can use heat and bending to straighten it. I won't go into any detail about this process as I have already covered it in my 1/28/2011 post on making quickie river cane arrows, and my 5/1/2011 post on making a river cane blowgun. In fact the whole process for making an atlatl tart is almost exactly the same as making a river cane arrow; just make the dart bigger.

Cut a straight hardwood foreshaft to insert into the front of your river cane. You want the foreshaft to go down into the river cane and rest on a joint. This will give it more strength. Leave about a foot of foreshaft sticking out of the cane. This foreshaft can be sharpened to a point if you are making a quickie survival dart, or you can mount a point on it if you are taking a little more time to improve on the survival dart. It will help strengthen the join between cane and foreshaft if you wrap the cane with some sinew or plant fiber just below the foreshaft. Pictured below: top, self point on dart; middle, point made of knapped beer bottle glass; and bottom, yucca fibers used to reinforce joint between cane and foreshaft.


Although the dart is usable at this point, you will find that it will fly much better if you add some fletching to the back of the dart. The fletchings may be a couple of whole feathers tied on opposite sides of the shaft using sinew or plant fiber, or you may improve on this by using split vanes attached with glue and sinew. Pictured below: top, whole feather fletching attached with yucca fiber; bottom, split vanes attached with sinew and glue.


There is no string notch on the back of an atlatl dart. Your atlatl attaches to the dart by slipping the point of the little projecting limb into the hole in the back end of the cane. It is not a bad idea to reinforce the back of the cane with a few wraps of sinew or plant fiber. Pictured below: Rear nock reinforced with sinew wrapping.

Next post will be a look at my fancy atlatl and dart.

Friday, June 17, 2011

Make an Atlatl and Dart - Part 1

The atlatl, also called a spear thrower, acts as an extension of the arm, and allows you to throw a projectile, called a dart, with great speed and power. The atlatl was developed a least 30,000 years ago and was used as a hunting and combat weapon by stone age man. Very large animals, including the wooly mammoth, were taken with the atlatl and dart. So, the atlatl is a viable survival tool. The problem is, becoming proficient with the atlatl takes way more practice than the average Joe is willing to expend. I have thrown the atlatl quite a bit, but I have yet to develop any kind of consistent accuracy. There used to be a couple of park rangers at the Poverty Point State Historical Site in Louisiana that were very good with the atlatl. They could consistently hit a deer sized target at seventy-five yards, and I have read about people going on wild hog hunts with the atlatl, so it can be done. Just not by me. Be that as it may, I'm going to show you how to make an atlatl in case you might be one of those people who can get the hang of it.

First let's make the atlatl. We're going to make a very plain-Jane survival type atlatl. The only tool you will need is a knife. First step is to locate a good tree branch for making your atlatl. The main part of the branch needs to be about an inch in diameter and straight for a length of about two feet. The bottom part of the branch needs to have a limb growing out of it at an angle of less than forty-five degrees. Picture below: A youg sapling with a branch coming of at the correct angle for making an atlatl.

When you locate the right branch cut it out; and, believe it or not, your atlatl is almost completed. Pictured below: Roughed out atlatl from sapling.

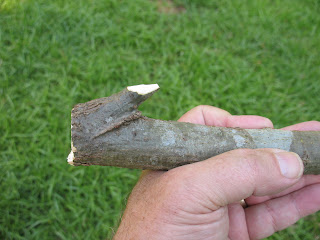
Use your knife to sharpen the small side branch to a point. This point will fit into the back of your dart. Pictured below: Point on branch used to hold dart.

You can now use your atlatl just the way it is, but you might want to attach a loop of cordage to front of your atlatl. This loop will fit around your wrist and help you keep the atlatl from coming out of your hand when you throw a dart. More about this when I do a post on how to use the atlatl. Pictured below: top, groove around handle of atlatl to hold cordage loop; middle, cordage loop made of yucca fiber attached to atlatl; bottom, atlatl loop fastened around wrist.


In the next post we will make a couple of atlatl darts.

Saturday, June 11, 2011

Edible Wild Plants - Wild Mulberries

DISCLAIMER: Don't believe anything I or any body else tells you about edible wild plants. Don't eat edible wild plants based on what you see in a book or on the inter-net. Get a qualified instructor to show you the plants, and don't eat them until the instructor shows you how to prepare them, and then eats them him or herself. Be aware that you may be allergic to a plant that someone else can eat without harm. Be sure that any plants that you gather have not been sprayed with pesticides or herbicides.

The wild mulberry tree (Morus rubra) grows throughout much of the eastern half of Texas. It gets to be a pretty good size tree sometimes growing as much as fifty feet tall. Pictured below: Young mulberry tree.

The mulberry has two different shapes of leaves. One is palm shaped, and the other is three lobed. Both are shiny on the top and dull on the bottom, and both have small jagged teeth on the outer margin of the leaf. Pictured below: Two different types of mulberry leaves.


The young bark of the mulberry is fairly smooth and green. The older bark becomes darker and more deeply ridged. Pictured below: top, young bark; bottom, older bark.


Of course the part we are interested in is the fruit. Please be aware that there are male mulberry trees and female mulberry trees, and only the female trees bare fruit. The young fruits appear in early spring and are green. Pictured below: Green mulberries.

As the fruits ripen they turn first red and then purple. The ripe fruits are about an inch long, and the tree will generally be loaded with them. All of the berries do not ripen at once, so you will have access to good berries for several weeks. Pictured below: Ripe mulberries.

When picking mulberries be warned, they will stain your hands and any clothing they come into contact with. Pictured below: Handful of juicy ripe mulberries.

Mulberries taste great raw. I have also used them to make cobbler and pancake syrup. If you pick a lot of mulberries you can freeze them for later use.

Monday, June 6, 2011

Survival Fishing - Make a Weight and Float

You can catch fish with nothing but a hook, line, and bait; but you can present your bait better, and thus increase your chances of catching fish, it you use a weight and float. A weight will hold your bait down in the water, and a float will help regulate the depth at which your bait is suspended. Pictured below: Yucca fishing line rigged with gorge hook, stone weight, and stick float.

An effective weight can be made from a small rock. You can just tie the rock onto your line, or you can use another rock to abrade a groove around your weight rock. This way the string will stay more securely in place around the rock. Pictured below: Marble size rock with groove around it.

A float can be made of anything that will float and support the weight of your hook, line, weight, and bait. You can carve a float out of a seasoned stick. Pictured below: Float made of seasoned hickory.

You can also make a float out of a section of river cane or bamboo. To make a float out of bamboo just cut a short section of cane leaving an intact joint on each end. The air trapped in the cane will cause it to float nicely. Pictured below: Float made out of a small section of river cane.