DISCLAIMER: Don't believe anything I or any body else tells you about edible wild plants. Don't eat edible wild plants based on what you see in a book or on the inter-net. Get a qualified instructor to show you the plants, and don't eat them until the instructor shows you how to prepare them, and then eats them him or herself. Be aware that you may be allergic to a plant that someone else can eat without harm. Be sure that any plants that you gather have not been sprayed with pesticides or herbicides. Pictured below: Wild Onion plant.
When you are cooking in your kitchen, onions are a nice addition to a stew or a salad, and they can really enhance a pot of greens. Just because you are in a survival situation is no reason to go without onions. In my part of the world wild onions are easy to find in the spring. Just make sure that you are picking onions (genus Allium) and not crow’s poison (Nothoscordum bivalve). Onions will flavor your food; crow’s poison will make you very sick. These two plants really don’t look much alike. The flowers are entirely different as you can see from the photos below. Pictured below: top, Crow's Poison; bottom, Wild Onion.
And the smell is totally different. They both have a bulb shaped root; but the wild onion smells like an onion, and the crow’s poison does not. Also, in my area the crows poison blooms first and then is completely gone when wild onions bloom. This may not be the same where you are, but it is definitely true here.
Pull wild onions when they are flowering and use them in stews, salads, or with greens. They have a strong taste so they are not so good if eaten by themselves. Pictured below: Wild Onion plant with flower, stem, and bulb.
When you pull wild onions, they will have an outer skin that is kind of like a fibrous netting over the bulb. Pictured below: top, Wild Onion bulbs with outer skin; bottom, Wild Onion bulbs with outer skin removed.
Remove this outer skin before using the bulbs. The green stalks of the wild onion can be chopped up and used like chives. Wild onions, just like garden grown onions, can be hung and dried for later use.
Tuesday, April 26, 2011
Thursday, April 21, 2011
Edible Wild Plants - Lamb's Lettuce
DISCLAIMER: Don't believe anything I or any body else tells you about edible wild plants. Don't eat edible wild plants based on what you see in a book or on the inter-net. Get a qualified instructor to show you the plants, and don't eat them until the instructor shows you how to prepare them, and then eats them him or herself. Be aware that you may be allergic to a plant that someone else can eat without harm. Be sure that any plants that you gather have not been sprayed with pesticides or herbicides. Pictured below: Lamb's Lettuce
Lamb's Lettuce is a member of the Valerianella family. There are at least a dozen different species of Valerianella and to tell you the truth I'm not exactly sure which one we have here in East Texas. All I know is that the old man who taught me about edible plants showed me this plant, showed me what to look for to identify the plant, showed me how to eat the plant, and told me that it was called Lamb's Lettuce. He had an interesting philosophy about naming plants. He used to say, "Don't think you know a plant just because you know its name." In other words, it's more important to know how to identify the plant, where to look for it, what time of year to look for it, what parts are edible, and how to prepare the plant for human consumption. That's the important stuff.
So back to Lamb's Lettuce. Look for Lamb's Lettuce in disturbed areas like old fields. It comes up in the early spring and will have little white flowers on the upper part of the stems. The most striking feature of Lamb's Lettuce, and the thing that makes it easy to identify is how the stems fork into a perfect "Y" shape. The leaves of Lamb's Lettuce are not large, but they have a very mild lettuce-like flavor. They are a true pick-and-eat wild green. Pictured below: Distinctive "Y" of Lamb's Lettuce stem.
I like to eat Lamb’s Lettuce as part of a wild salad made with other greens that are available at the same time. Lamb’s Lettuce, Chickweed, and Yellow woodland sorrel make a good combination. The Yellow Woodland Sorrel adds a nice lemony taste to the salad. Just wash your salad greens and if you have it add a little oil and vinegar and maybe some salt and pepper. Makes a really tasty salad. Pictured below: Top, Dish of Lamb's Lettuce; bottom, Mixed greens including Lamb's Lettuce, Chickweed, and Yellow Woodland Sorrel.
Of course if you are in a survival situation, you can eat any or all of these as a raw nibble. I will put some info about Chickweed and Yellow Woodland Sorrel in future posts.
Sunday, April 17, 2011
Fishing with Spears
One way to harvest fish is with a spear. Unless you are in a survival situation spear fishing is pretty well limited to non-game fish, so if you want to practice spear fishing make sure that you do it in a legal manner. Pictured below: Fish spears
One thing that we have going against us in East Texas is that there is not much clear water. It is usually pretty hard to see fish in our mud bottom rivers and lakes. One time of the year when spear fishing, or bow fishing, is popular is in the spring when the Gar are spawning.
These big fish come up into the shallows and roll on the surface of the water in spawning season and are an easy target for a spear. The main problem with spearing Gar is that they have a very tough skin. Early Spanish explorers referred to them as "the armored fish" and Native Americans actually used the dried scales for arrow points. So if you are trying to spear Gar, make sure you have a sharp and durable spear.
I have three fish spears. One is the kind that you can buy at hardware or sporting goods stores. You just buy the spear head and then attach it to a wooden shaft. Pictured below: Fish spear with store bought point.
I have another spear that a friend of mine made for me. The shaft of this spear is a sealed hollow tube, so if you drop it in the water it actually floats back up and about a foot of the shaft bobs up out of the water. Pictured below: Floating fish spear.
I have a survival spear that I made out of a Hickory sapling and some Yucca cordage. To make this spear I cut a small Hickory tree, and while it was still green I split the smaller end into four pieces. I wrapped cordage tightly around the bottom of the split section to keep it from splitting any farther. I then placed small sections of dried limb across the bottom of each split to spread the barbs out. Some more Yucca cordage was added to hold the barbs together above the wedges. I used my knife to taper and shape the barbs. Pictured below: My survival fish spear.
One thing that you have to keep in mind when you are spear fishing is that the fish is not where it appears to be. Because of the light being refracted by the water, the fish is actually closer to you than it appears. I've read all kinds of formulas for calculating where the fish is, but I don't see myself doing the math fast enough to spear a fish. It's one of those things, like instinctive archery, that you just have to practice.
Monday, April 11, 2011
Edible Wild Plants - Dandelion Greens
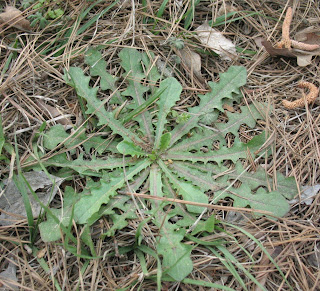
DISCLAIMER: Don't believe anything I or any body else tells you about edible wild plants. Don't eat edible wild plants based on what you see in a book or on the inter-net. Get a qualified instructor to show you the plants, and don't eat them until the instructor shows you how to prepare them, and then eats them him or herself. Be aware that you may be allergic to a plant that someone else can eat without harm. Be sure that any plants that you gather have not been sprayed with pesticides or herbicides. Pictured below: Dandelion Greens
Most parts of the Dandelion (Traxacum officinale) are edible, but for right now we're just going to talk about the greens. Dandelions are pretty easy to identify. The leaves grow in a rosette that is close to the ground and about three to six inches in diameter. The leaves are deeply toothed. In fact, the plant gets its name from the French dent d'leon which means "tooth of the lion." In the center of the rosette the Dandelion puts up a shoot with a round yellow flower on it. Pictured below: Dandelion flower
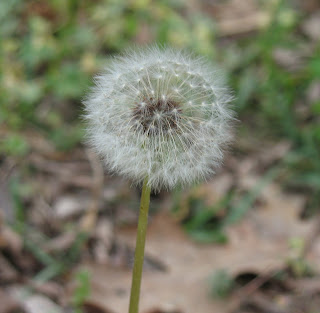
In older plants this flower turns into a white puff-ball that kids love to pick and blow on so that the down flies away into the air. Pictured below: Dandelion puff-ball
The green is edible and very nutritious and some will tell you that you can pick it and eat it as a salad green straight off the plant. I must respectfully disagree. These are either (a) people who have never eaten a Dandelion Green, (b) people who are heavy smokers and have no taste buds left, or (c) cruel practical jokers. I have never tasted a fresh Dandelion Green that wasn't bitter. Maybe they exist, but I haven't run across them. Fortunately, the chemical that causes Dandelions to be bitter is water soluble, so it is easy to get rid of.
This is the easiest way to prepare Dandelion Greens so that they taste good. Collect a basket of fresh young Dandelion Greens. Gather more than you think you need because they will shrink when you cook them. Chop the greens up into one or two inch pieces and wash them. Bring two pots of water to a good boil. Drop the greens into the first pot and let them boil for three minutes. Pour the boiled greens into a strainer to remove the water, then dump the greens immediately into the second pot of boiling water and boil for another three minutes. Remove the greens from the second pot, strain, add salt and pepper to taste and serve. I like them with a little vinegar sprinkled on them, or better yet, a little Pepper Sauce.
If you want to avoid the boiling, you can wilt Dandelion Greens. Here's how to wilt greens. Pick a mess of fresh, young Dandelion Greens. Wash the greens and place them on a plate or in a shallow bowl. Fry up several pieces of bacon in a skillet. Pour the hot bacon grease over the greens. Crumble up the bacon and sprinkle it over the greens. Some people like to chop up a hard-boiled egg and add it to the greens. That's it; time to eat. You can use this same recipe with other types of greens including that lettuce that has started to wilt a little on its own.
Wednesday, April 6, 2011
Make a Minnow Trap from a Two Liter Plastic Bottle
This is a quick and easy way to make a minnow trap out of a two liter plastic bottle.
Equipment needed:
a two liter plastic bottle
a knife
five or six feet of cordage
some small wire or paper clips (helpful but not necessary)
a nail or ice pick (helpful but not necessary)
some kind of bait ( bread crumbs, dog food, etc)
Directions:
1. Remove the bottle cap and dispose
2. Using your knife, cut off the cap end of the bottle at the point where the bottle starts to taper down from its full width.
3. Use you knife, nail, or ice pick to poke two holes in the bottom of the bottle.
4. Thread your cordage through these two holes and tie the cordage off.
5. Use your knife, nail, or ice pick to poke six or eight small holes in the body of the bottle. This will allow air in the bottle to escape, and help the bottle to sink down into the water.
6. Now the tricky part. Invert the top of the bottle that you cut off, and insert it down into the body of the bottle.
7. Line the edges of the bottle up and use your knife, nail, or ice pick to poke a small hole through both layers of the plastic. Make the hole about a quarter inch back from the edge and be careful not to cut all the way to the edge.
8. Take some small wire, a piece of paper clip, or some small string and thread it through both hole, loop the string over the edges of the plastic and tie a knot in the string.
9. When this is done poke two or three more holes around the rim of the trap and run wire or string through them just as you did the first hole.
10. Drop a few pieces of bread or some dog food down into the bottle, and you are done.
Take your trap down to the water, push it down to get some water inside the bottle, then toss the bottle a few feet out into the water. The air will escape through the holes that you punched, and the bottle will sink. Use the string attached to the bottom to tie the trap off to a log or rock and let the trap sit for twenty-four hours.
If there are any minnows in the area, they will swim into the bottle to get at the bait, and then they won't be able to find their way out. All you have to do is pull the trap in and remove your minnows.
Be aware that because of the small size of this trap you will not get many minnows in one trap (I usually get three to six). So if you want to get a good mess of minnows, you should put out multiple traps.
Saturday, April 2, 2011
Edible Wild Plants - Green Briar Shoots
DISCLAIMER: Don't believe anything I or any body else tells you about edible wild plants. Don't eat edible wild plants based on what you see in a book or on the inter-net. Get a qualified instructor to show you the plants, and don't eat them until the instructor shows you how to prepare them, and then eats them him or herself. Be aware that you may be allergic to a plant that someone else can eat without harm. Be sure that any plants that you gather have not been sprayed with pesticides or herbicides. Pictured below: Green Briar Vines
We've all had run-ins with Green Briars (Smilax rotundifolia) while walking through the woods. You know, those long waxy green vines with nice sharp thorns on them. They are easy to identify because they are the only vine around here that has both tendrils and thorns. Pictured below: Green Briar leaves
They root in the ground and grow up into shrubs and trees and create a real tangle of thorns that can really slow you down. Well, even Green Briars have a few useful purposes. Their main useful purpose as far as we are concerned is that they provide an abundant, nutritious, and easily harvested source of food. Check out a briar patch in the spring time and you will see that the vines are putting on new growth.This new growth is a lighter green than the older part of the vine, and it is soft. It hasn't developed the waxy bark and woody core of the older vines. Pictured below: Green Briar Shoot
These young shoots can be pinched off of the vine, just above the first thorn, and eaten on the spot; or they can be collected and then steamed or boiled. They have a flavor kind of like green beans. If you have a little salt and pepper to add to them they are very tasty. Pictured below: Green Briar Shoots ready to eat raw or cook and eat like green beans.
Just don't take all of the shoots, as rabbits, deer, and other critters love to browse on them. Although the greatest abundance of Green Briar shoots are found in the spring, you can find a few at almost any season other than the dead of winter.
Subscribe to:
Posts (Atom)