Pages

Tuesday, December 17, 2013

Renewable Spaghetti


My wife and I both love spaghetti, and we keep a good supply of angel-hair pasta in our food storage; but in a long term survival situation, we will eventually run out of pasta.  No more spaghetti.  Of course you can make your own pasta, but if you’ve ever done that you know it’s a lot of work; and that’s if you already have the flour. So, we were looking for another alternative.

A couple of years ago a friend asked if we’d ever tried spaghetti squash.  I told her that we had not; in fact I didn’t even know what spaghetti squash was.  She proceeded to tell me how to prepare it so we gave it a try.  It tasted great and it was totally crazy to see what looked like spaghetti coming out of the inside of a squash.  Many of you have probably tried spaghetti squash, but some of you, like me, may not even know what it is.  Here is a brief tutorial on how to prepare spaghetti squash for those who don’t already use it.

First take a spaghetti squash and cut it in half.  It takes a good sharp, serrated knife to do this because the skin is pretty tough. 

Next, take a spoon and scrape out the seeds from the inside of the squash.  If it’s an heirloom be sure to save the seeds.

Place a steaming rack into a good size pot of water and bring the water to a boil. 

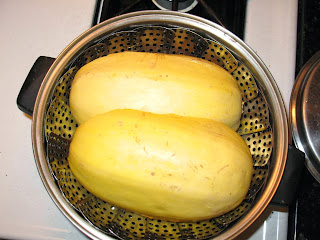
Place the halves of spaghetti squash, cut side down, on the steaming rack, cover, and let it steam for twenty minutes or so depending on the size of the squash.

Remove the squash from the steaming rack.  Use hot pot holders because it will be very hot.

Take a fork and begin scrapping the flesh out of the squash and into a bowl.  As you scrape, the flesh will come out in little strands that look like spaghetti.  It is really freaky looking, the way it comes out.

I like to add butter, salt, pepper, and garlic to the strings of squash and stir it all in.

Dish a serving out onto a plate, pour hot spaghetti sauce on top, and you are ready to eat.

If you have electrical power you can cook the squash in your microwave.  Take the whole squash and poke eight or ten holes down into the center with an ice pick.  Microwave the squash on high for ten or twelve minutes, cut the squash in half, scrape out the seeds, and remove the flesh.

We love spaghetti made with spaghetti squash.  After we tried it the first time, we new this was a winner.  In fact, I don’t think we’ve eaten regular pasta since then.  I went to a feed store in a near-by town that carries a full line of heirloom seeds, and I bought a bag of spaghetti squash seeds.  These seeds; along with the heirloom tomatoes, onions, garlic, and herbs that we grow; mean that we will now have a lifetime renewable source on spaghetti for our dinner table.

Sunday, December 8, 2013

The Difference Between Summer Squash and Winter Squash


When I first started gardening I always planted yellow crook-neck squash and zucchini.  I always got a ton of squash.  We would eat squash until we were sick of it.  Then we’d give squash to the neighbors until they pulled the drapes and quit coming to the door.  Finally we’d start throwing it out into the woods.  But by November the squash season would end and before long we’d be craving fresh squash.  I tried every possible way to store squash.  I tried canning, freezing, and drying.  It just didn’t taste anything like fresh squash.  I could, of course, have bought fresh squash at the grocery store, but my blood boiled at the thought of paying $1.79 a pound for something that I was throwing away two months earlier. That’s when I discovered winter squash.
Now, don’t let the name fool you.  You might think that winter squash is some kind of squash that grows in the winter.  It does not.  When the frost comes, winter squash plants die just like summer squash plants.  The difference is that winter squashes have a thick, hard skin that allows them to be stored for a long time, so you can eat them far up into the winter.

Examples of winter squash are Butternut Squash, Acorn Squash, and Spaghetti Squash.  All of these are available as heirlooms, so you can save the seeds to replant.  You need to plant winter squash in the early to mid-summer to allow time for them to produce before the first frost.  Around where I live that means planting in early to mid July since our first frost is usually in mid-November.

It’s best to harvest winter squash before it gets a frost on it.  Squash picked after a frost will not store as long.  You only want to store blemish free squash.  It is best to cut the squash from the vine leaving a couple of inches of stem.  After harvesting, you should set the squashes out in a warm, dry place to cure for a couple of weeks.  Set the squashes so that they’re not touching.

After the squashes are cured you store them in a cool, dry, place and they will keep for a good while.  Acorn squash will keep for about a month.  Spaghetti squash will keep a little longer.  Butternut Squash (which makes a great soup) will store for as much as six months.  So, if you play your cards right and pick the right varieties, you can have fresh squash nearly year round.

Sunday, December 1, 2013

Don’t Forget the Work Gloves


It’s easy to get seduced by the flashy side of preparedness.  By this I mean the assault rifles, the freeze dried foods, the exotic off-grid energy systems, etc.  I’m not saying that these things don’t have a place in preparedness; I’m just saying that sometimes we place a little too much emphasis on these big ticket items and forget about the small, mundane things that will be part of day-to-day life in a long-term survival situation.  For example, do you have a back-up supply of work gloves?

Think about it, self-sufficient living involves a lot of manual labor.  Right now, I work outside on my farm about two hours a day; maybe four to six hours a day on weekends.  A lot of this work involves wearing leather work gloves.  I’ve never really kept track of it, but I would estimate that a pair of work gloves lasts me about nine months.  In a total self-sufficiency environment I can see that dropping down to something like six months or less.
You could opt to just work without gloves and put up with the pain until your hands get tough; but it’s about more than pain.  Remember, you are now in a situation were ever cut, scrape, or puncture could be life threatening.  No antibiotics to treat an infection; no tetanus shots to prevent lock-jaw.  A cut on the hand could kill you as dead as a bullet.  So you really need to wear gloves if there is a chance of injury in what you are doing.

Now think about what would be involved in making a pair of work gloves.  You would have to harvest the hide.  Then you would have to tan the hide (trust me when I tell you that this is a pain, even if you know what you’re doing).  Then you would have to cut out the leather (assuming that you already have a pattern), hand-punch the leather with an awl, then hand-stitch the gloves together.

Recently, one of the hardware chains had work gloves on sale, five pair for $5.99.  A great price considering that I usually pay four to six dollars for one pair.  I went down and bought ten pair and added them to my survival storage.  They’re not exotic, and they’re not expensive, but they are an everyday necessity if you plan to survive.

While we’re on the subject of gloves, do you have extra winter gloves?  I keep two pair of lined pig skin gloves for winter. 
I also have two pair of rag-wool gloves without fingertips.  These are very handy when you are doing something that requires a good deal of manual dexterity, like screwing a small nut and bolt together or working a combination lock on a gate.  I also wear these gloves when I’m picking dewberries and black berries.  They are a real help at protecting your hands from those itchy thorns while leaving your fingertips free to pluck berries off the vines.
I use a pair of insulated wool mittens when hunting in cold weather.  The tips of the gloves fold back and expose your fingertips so that you can use a bow and arrow or pull the trigger on a rifle.  Very handy.
I keep several pair of Playtex gloves, the kind that your mother used to wear when doing dishes.  These      are good for butchering game and processing hides.
And lastly, I have two boxes of non-latex exam gloves to use in medical emergencies.  I also carry a pair of these when I’m hunting so that I can wear them when field dressing game.  This may seem overly cautious to some, but a twenty cent pair of gloves is a lot cheaper than treating a case of tularemia that you catch when dressing an infected animal.
 So there you go.  There’s nothing very exotic about gloves, but when you are in a survival situation they can sure make a big difference in the quality of your daily life.  So spend a relatively small amount of money and prepare yourself with a good selection of gloves.