Pages

Friday, March 30, 2012

Edible Wild Plants - Pokeweed

DISCLAIMER: Don't believe anything I or any body else tells you about edible wild plants. Don't eat edible wild plants based on what you see in a book or on the inter-net. Get a qualified instructor to show you the plants, and don't eat them until the instructor shows you how to prepare them, and then eats them him or herself. Be aware that you may be allergic to a plant that someone else can eat without harm. Be sure that any plants that you gather have not been sprayed with pesticides or herbicides.

Pokeweed (Phytolacca americana) goes by many names. Pokeweed, Poke Salat, Poke Salad, and Pokeberry are some of the most common. Poke is a spring green that is native to North America. Poke is one of those plants that can be dangerous if it is prepared wrong. Never eat Poke Greens raw, and never, ever eat the berries, stems, or roots at all, raw or cooked.

Poke will sprout up in the early spring in old pastures, fields, burned over areas, recently logged areas, or other areas where the soil has been disturbed. The season for gathering Pokeweed is very short. When it gets over a couple of feet tall it has too much saponin in it, and it will make you sick no matter how you prepare it. If you find small Pokeweeds later in the spring, don't pick them. They will be too high in saponins even though they are still small. Pictured below: Young poke in very early spring

So, now that I have scared you to death; let's talk about how to gather and prepare Pokeweed. Refer to the pictures above to identify Pokeweed. It has a pretty unique appearance, and I don't personally know of any other plant around here that looks even remotely like Poke. It has shiny oval shaped leaves that are smooth on the edges and about four inches wide by six to ten inches long. The leaves are alternate, which is to say that they don't grow exactly opposite on each side of the stalk; but rather there will be a leaf on one side of the stalk and then the leaf on the other side of the stalk will be a little higher or lower. After you have located a good Pokeweed, take a look at it. It should be all green. If the stem has started turning purple, that means that saponins are starting to build up in the plant and you don't want it. If the plant looks good you can pull off the leaves. I usually do not pull any leaves that are over eight inches long. Pictured below: This poke is ready to pick

Chop the leaves up into pieces one to two inches long, rinse in cold water and place in a pot filled with cold water. Wash your hands and the chopping knife with soap and water. Bring the pot to a full boil, and boil the Poke for about ten minutes. Pour off the Poke and water through a strainer, rinse the Poke. Rinse out the cook pot and refill with cold water. Place the Poke back in the pot, bring to a boil, and boil for another ten minutes. Strain, and rinse the Poke again. Rinse out the cook pot, refill with cold water, and boil the Poke for another ten minutes.Your Poke is now ready to eat

Poke tastes great when cooked with a little fatback and pepper, or you can cook it with just salt and pepper. But the absolute best is poke salit with cornbread dumplings. In my next post I’ll tell you how to make cornbread dumplings to go with poke, collards, or any other green.

Saturday, March 24, 2012

Build a Bamboo Survival Bow in 30 Minutes

Bamboo has been used for millennia to make fine bows. It is tough, straight grained, very flexible, and easy to work. Bamboo is used for backing on many traditional laminated bows. This bow is neither fine, nor traditional, nor laminated; but it is quick and easy to make, and it works.

To build this bow you will need a nice large cane of bamboo. The walls of the cane should be at least three-eights of an inch thick, and the cane need s to be about five or six feet long. Pictured below: Bamboo for bow making

Use a hatchet, or heavy knife to split the cane in half. Pictured below: top, Splitting bamboo; bottom, two pieces of the split cane


Now take one of the pieces of bamboo and use your hatchet or knife to split off the sides and narrow the part that you will use to about two inches in width. Pictured below: top, Splitting off sides; bottom, two inch wide stave


Use you hatchet and knife to shape the front profile of the bow. It should be about two inches wide in the middle and taper to about one inch on the tips. Pictured below: top, Shaping bow with the hatchet; middle, tapering the limbs; bottom, finished profile


Next you can use your knife to carve a couple of notches in each end for the bowstring. Pictured below: Carving notches

Now it’s time to make the handle. Cut a stick that is about an inch to an inch-and-a-half in diameter and about a foot long. Taper the ends of the stick as shown below. Pictured below: tapering the handle stick

Carve out any joints in the area where the handle will rest then test the fit of the handle. Pictured below: top, carving out a joint; bottom, handle resting in place in the cane


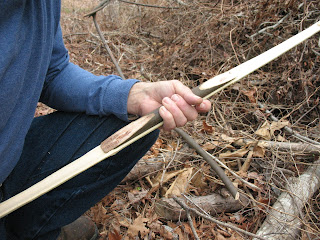
If the handle fits you can take some cordage and wrap the handle to secure it in place. In the illustration below I am using some yucca cordage that I had made earlier, but you can use para-cord, a shoelace, or anything else that you have. Pictured below: Wrapping handle

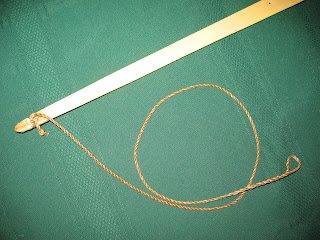
All you need now is a bowstring. I used some more yucca cordage for my bowstring. Pictured below: Finished bow, strung and ready for use

This particular bow, which is only about a quarter inch thick, is not all that powerful, about twenty pounds; but thicker bamboo will make a more powerful bow. I wouldn’t hesitate to use this bow to try and take a rabbit, coon, possum, or other small game. Pictured below: Bamboo bow at full draw

Tuesday, March 20, 2012

Remington Model 770 in .308 Caliber - Review

I recently purchased a Remington 770 in .308 for my son’s graduation present. He was home the other day, so we took it out to give it a try, and I thought I would post our impressions of this rifle. Pictured below: The Remington 770

First off, if you are gun as work of art type person, this is not the rifle for you. If you are a gun as tool type person, then read on.

The Remington 770 is a very plain utilitarian type of rifle. It is bolt action with a synthetic stock and comes with a factory mounted 3 – 9 x 40 scope. The 770 that we bought has a matte black barrel and stock and is chambered for .308 Winchester. You can see at a glance that it is not a fancy rifle. No burled walnut, skip checkering, ivory inlays, or etc.; but on the plus side it does not carry a fancy price tag. You can pick one up for around $300.

Before you fire it you need to give this rifle a good cleaning. The bolt in particular needs to be de-gunked, and it wouldn’t hurt to work it over with a little 0000 steel wool. The bolt is not a tight fit in the receiver and the play causes it to feel a little rough sometimes when you are cycling the bolt. Don’t misunderstand, the bold locks down tight and solid. There’s no safety concern here. It’s just a matter of not operating as smoothly as you might like. Pictured below: top, the 770 receiver; bottom, bolt drawn back


Pulling up a small lever on the top left of the receiver allows you to withdraw the bolt for easy bolt and barrel cleaning. Pictured below: top, bolt release lever; bottom, bolt withdrawn


The 770 has a four round box magazine which is easy to remove and load. I like this feature. Pictured below: The detachable box magazine

The scope has been bore sighted at the factory so when we started off at 50 yards we were at least on the paper, only about three inches off center. When you sight this rifle in get some sand bags and do it right. At a dollar a round you don’t want to burn a lot of ammo getting sighted in. Pictured below: Factory mounted scope

The rifle shoots fine. Accuracy is well within our deer hunting needs. We were a little worried about recoil since the synthetic stock makes this a very light firearm, but it was not bad at all. Pictured below: top, Rifle sighted on target; bottom, rifle in recoil


This is not a gun that you would want to buy if you are going to shoot a thousand rounds a year on the range. It just wasn’t intended for that kind of use. But if you are going to run a box of shells through it every deer season, it will still be in good service when your grandchildren are ready to use it.

All in all we are happy with this rifle. It will do the job that we need it for, and it didn’t cost an arm and leg, so what’s not to like.

Friday, March 16, 2012

How to Sinew Back a Wooden Bow - Part 3

It’s been two weeks and the sinew on our bow is completely dry, so now it’s time to finish it out. Pictured below: Bow with dried sinew backing

The first thing that we will do is to wrap the tips with sinew to keep the backing from coming lose at the tips. You can just take a few strands of sinew and chew on them for a minute. The chewing and the enzymes in your saliva will soften the sinew and activate the natural glue in it. Wrap both ends and set the bow aside for an hour to dry. When the sinew wraps are dry you can trim off the excess sinew that is lapped over onto the belly of the bow. Pictured below: Bow tip wrapped with sinew

Next we need to make a string. Sinew stings are very nice and very authentic, but they require considerable care. Since this bow is for a little boy I am going to make the string out of waxed Dacron. It looks good and it is very durable. Pictured below: Dacron string

The bow may require a little re-tillering after it is backed. No matter how carefully you apply the sinew, you are going to get a little more on one side than the other. It usually doesn’t make a great difference, so only a little tillering will be required.

Now the bow is essentially finished so we are going to apply a good coat of polyurethane to seal the wood and protect the sinew from moisture. Let the polyurethane dry over night and then there is one last thing to do. Pictured below: Applying polyurethane to the bow

It is by no means necessary, but a nice leather hand-grip gives the bow a finished look. On this bow I decide to use tanned deerskin for the grip. After careful measuring and cutting, I punch holes in the grip, apply some glue, and sew the grip in place. Pictured below: Leather grip glued and sewn in place

And here is the finished product, strung and ready to wreak havoc on the neighborhood cats. Pictured below: Finished bow

Sunday, March 11, 2012

How to Sinew Back a Wooden Bow - Part 2

So now we have everything organized so let's start sinewing. By the way, you probably want to do this in the kitchen or somewhere that has a good supply of water. You will be washing your hands continuously to get the sticky rawhide glue off of them. So, back to sinewing. Take a bundle of sinew between your fingers and dip it down completely into the warm glue. Swish it around a little to make sure it is completely saturated with glue. You may even want to just leave it in the glue for thirty seconds or so to make sure that it is soft. Pictured below: Dipping sinew bundle in warm glue

Now lift the bundle up out of the glue and use the fingers of your other hand to squigee the excess glue off of the bundle. Pictured below: Squeezing excess glue off of the sinew

I like to start in the center of the bow at the handle with my first bundle and then work a straight line out to one end of the bow; so take your first bundle, lay it down on the bow back in the center of the handle, and press it down flat. Rub it with your finger to flatten it out. Pictured below: Laying on the first bundle of sinew

You're on your way. Do another bungle and lay it up so that it just overlaps the end of the first bundle. Pictured below: Applying the second bundle

Keep extending your line of bundles down the center of the bow until you reach the end, then lap the last bundle over the end and about an inch and a half down the belly (the side of the bow that faces you when you are shooting). Pictured below: Folding sinew over the tip and onto the belly

Now you can start your second course of bundles. You want to lay these up right next to the first course but place them so that they are staggered in relation to the first course. In other words, you want to lay them like you are laying bricks so that the joints don't line up. Pictured below: Starting the second course of sinew

Keep running new courses of sinew until you have completely covered half of the bow, and then you can start on the other half of the bow and follow the same procedure. When you have the entire back covered with sinew, paint a coat of rawhide glue onto the backing and set the bow aside to dry. Pictured below: Bow with sinew backing in place

If you are going to put a second layer of sinew on the bow it is best to let the first layer set up for an hour before you start the second layer. Apply the second layer just as you did the first layer. Paint it with a coat of glue and set it aside to dry.

If you are going to apply more than two layers of sinew the first two layers must be allowed to dry completely before you add any more.

Now comes the hard part. It will take the sinew at least a week to dry out. I usually give mine two weeks because I've put too much work into the bow to have it ruined by impatience. If you string or bend the bow before the sinew is completely dry, the sinew will separate from the wood and you will have nothing. As the sinew dries it shrinks and you will probably see the bow begin to pull into a slight reflex.

So, let’s set our bow aside to dry for a week, and then we’ll finish it out.

Tuesday, March 6, 2012

How to Sinew Back a Wooden Bow - Part 1

Putting a sinew backing on a wooden bow will improve the bow in a number of ways. It will keep fibers from lifting up on the back of the bow, and thus help prevent the bow from breaking. It will help keep the bow from following the string (the tendency of the bow to stay a little bent after you have un-strung it). It will give the bow more snap when you release an arrow, and it will increase the draw weight of the bow a little. For all of these reasons, sinew backing is a good policy with wooden bows; and I rarely build a bow anymore that I don't sinew back.

I am currently building a bow for a friend's little boy, so I thought this would be a good opportunity to do a post on how to sinew back a bow. The bow in question is thirty-six inches long and made of hickory. Hickory is a very good bow wood, but it is a little sluggish on release and it does have a tendency to follow the string. A layer of deer sinew on the back of the bow should eliminate the string follow and give the bow more snap. Pictured below: The bow that I will be sinewing

To sinew back a bow you will need the following:

A wooden self bow (see posts of January 25 through February 15, 2009 on how to make a wooden bow)
Some liquid detergent
A hacksaw blade or coarse wood rasp
Something to hold the bow while you sinew it
Sinew fibers (see post of November 7, 2011 on how to prepare sinew)
Rawhide glue (see post of November 27, 2011 on how to make rawhide glue)
A brush to apply the glue with (see post of February 20, 2012 if you want to make your own brush)
A cook pot and heat source
A lot of clean water

The question is often asked, "How much sinew does it take to back a bow?" I've tried to work out some kind of formula for this, but I haven't had any luck. There are just too many variables. Sinews come in different thicknesses and different lengths, bows can be wide or narrow, they can be long or short. You may just want one layer of sinew on your bow, or you may want four or five. I guess you could figure out how many grams of sinew it takes per square inch, but my guess is that you would probably be wrong. With the type of bows I usually make I figure four to six sinews per layer of backing. I always do up more sinew than I think I'll need. That way I don't run out in the middle of backing a bow, and I can always use the excess on the next bow that I make.

I like to use a trick that I learned from one of Jim Hamm's books to help keep my sinew organized while I'm backing a bow. After you have your sinew separated into fibers, sort it into little bundles of six to eight strands. Take these little bundles and put them in an old magazine with a page separating each bundle. All you have to do is turn the page and you will have a new bundle of sinew fibers ready to use. Pictured below: Sinew organized in bundles between the pages of a magazine

The first step in preparing a bow for sinew backing is to thoroughly wash the back of the bow with detergent to remove any oils that might be on the bow. If the back of the bow is not clean when you sinew it, the sinew may separate from the wood when you draw the bow. So, don't skip this step. Some people wash the back of the bow with a lye-water solution. Lye has become increasingly hard to find. Somebody told me that it is used somehow in the process of making meth, so a lot of stores have quit carrying it. I don’t know if that’s true or not, but I do know that our local grocery store doesn’t cary it anymore. So now I just wash my bows with detergent and it seems to work fine. Pictured below: top, Washing the bow back: bottom, drying the bow


Step two is to rough up the back of the bow so that the sinew will adhere to it better. You can do this by dragging an old hacksaw blade along the back, or you may use the coarse portion of a wood rasp. You're not trying to remove any wood. Just scratch the surface up a bit. Pictured below: roughing the bow back with a hacksaw blade

When you have the bow roughed up it is time to warm up your rawhide glue. I am using unflavored gelatin for my glue. Most people don't realize that gelatin is made from powdered beef hide. Don't tell your kids this or they will never eat Jello again. All you have to do to make your glue is dissolve the gelatin in some warm water. I put a pot on the stove and heat about two cups of water and then stir in about three of the small packs of gelatin. Don't cook the glue; just warm it up. If you can't dip your fingers into it, it is too hot; and it will cook the sinew and make it useless. Pictured below: Mixing up some rawhide glue

When the glue is ready, take your brush and paint a coat of rawhide glue onto the back of the bow to prime it. Give the glue about ten minutes to set up and it will be time to start applying sinew. Pictured below: sizing the back of the bow with rawhide glue

In the next post we will apply the sinew.

Wednesday, February 29, 2012

Making a Fire with the Bow and Drill – Part 2

The first step in making fire is to burn-in your fire board. Burning-in is the process of making the hole in your fire board that the spindle will fit into. You should have already used your knife point to start a small hole in the fire board. This starter hole should be in the center of the fire board about two inches from either end. When the starter hole is complete you may begin the-burning in process.

BURNING-IN (directions for right handed person):
1. Lay the fire board on the ground with the starter hole to your right.
2, Kneel down on your right knee and place the ball of your left foot firmly on the fire board about two inches to the left of the starter hole.
3. Take the bow in your right hand and the spindle in your left hand and wrap the bowstring one time around the spindle about three inches above the pointed end. This may take a few tries. Remember, you have to end up with the bow in your right hand, the string to the left and the pointed end of the spindle pointing down. Pictured below: Proper position of the string around the spindle.

4. Place the pointed end of the spindle into the starter hole. Take the handhold in your left hand and set it over the top of the spindle. Brace your left wrist on the outside of your left ankle so that the spindle won't wobble around when you start to turn it.
5. With your right hand, very slowly begin to move the bow forward and back the full length of the string. Be sure to keep the bow parallel to the ground through the entire length of the stroke. If you saw up and down with the bow it will cause the string to run up and down the spindle and either run off the end of the spindle or pop the spindle out of the starter hole. Pictured below: Turning the spindle to burn in the hole.

6. Hold the handhold onto the top of the spindle with very light pressure. It is a common mistake to apply to much pressure in which case the spindle will become hard to turn, and the bowstring will begin to slip.
7. Once you get the spindle turning properly it should only take a few strokes and you will begin to see a small whiff of smoke as the spindle begins to burn a hole down into the fire board. Do not burn to deeply. One fourth of an inch is plenty. Pictured below: Burned in hole in fire board


NOTCHING THE FIRE BOARD
Now that you have burned in your fire board it is time to carve the all important "notch." The notch is a pie shaped hole that is cut out of the side of the fire board. The notch starts at the edge of the fire board where it is about 1/4 inch wide and tapers to a point at the center of the hole that you have just burned into the fire board. The glowing coal that you will use to start your fire will form in this notch. Pictured below: top, cutting the notch; bottom, the finished notch


PREPARING THE SPINDLE
There is one last thing to do before you actually start the fire. Take your knife and re-sharpen the point of the spindle. Be sure to remove all of the charred wood from the end of the spindle. This step needs to be repeated each time you use the spindle. Charred wood on the end of the spindle will cause the spindle to turn to easily in the hole, and you won't have enough friction to form your coal. Pictured below: Removing char from the end of the spindle

FORMING THE COAL
Now you are ready to form a glowing hot coal with your fire making tools. Be sure and have a double handful of dry, fluffy tinder ready to accept the coal once it is formed.
To begin forming the coal set your fire board and spindle up just like you did to burn-in the hole. The only difference in the set-up is that this time you need to set a dry leaf, thin chip of wood, piece of bark or something under the notch in the fire board. The purpose of this piece of material is to catch the coal as it falls from the notch. You can then pick up the leaf or piece of bark and transfer the coal to your bundle of tinder. Pictured below: Bark placed below the notch in the fire board.

Some people set the fire board down on top of the bundle of tinder so that the coal will fall directly into the tinder. This will work fine as long as the tinder is setting on a perfectly dry surface. But if the surface is the least bit damp, the tinder will suck up moisture like a sponge, and your coal will never turn into a flame.

Now that you are all set up, begin working the bow back and forth just as you did to burn-in the hole. Remember to use very light pressure at first. Take long, fairly slow strokes to warm up the spindle and fire board. As the fire board begins to smoke a little, increase the pressure on the handhold just a little and turn the spindle a little faster. Remember to use the full length of the bow when you are turning the spindle. Don't make the stroke any shorter just because you are moving your hand faster. Pictured below: Fire board and spindle starting to smoke.

The spindle and the fire board should now be smoking heavily and a pile a black, smoldering powder should be filling up the notch. It is now time to sprit for the finish line and form that coal. Apply more pressure to the handhold, (not to much or the string will start slipping). Now, stroke hard and fast, the full length of the bow, about ten or twelve times. Smoke should be pouring off of the spindle and fire board. Pictured below: Lots of black powder and heavy smoke mean the coal has probably formed and is ready to transfer to the tinder bundle.

Stop stroking. Set the spindle and bow aside. Don't get in a hurry. If you have a coal, the powder in the notch will still be smoking and the coal will burn for quite a while. Now take the point of your knife and place it at the top of the notch. Lift the fire board gently as you press the knife point down through the notch. The still smoldering coal should fall out onto the leaf or bark that you placed under the notch. Carefully transfer the coal to the center of your bundle of tinder. Pictured below: top, Using knife point to flick the coal out of the notch; middle, glowing coal on the piece of bark; bottom, transferring the coal to the tinder bundle.


BLOWING THE COAL INTO A FLAME
You would be surprised at how many people can produce a coal and get it into the tinder bundle and then never get the tinder to flame up. Often this is because of moisture, but sometimes it is because of poor technique.

When you have transferred the smoldering coal to the tinder bundle, pick the tinder up very carefully and cup it in your two hands. Very gently fold your hands up so that you bring the outside edges of the tinder bundle up and around the coal like a fluffy nest. Don't press in so hard that you smother the coal or flatten out the tinder. Just nuzzle the tinder up gently around the coal. Now blow softly, not like you're trying to blow out a candle, but softly. The coal should begin to glow a dull red. Blow a tiny bit harder and keep the fluffy edges of the tinder in light contact with the coal. The coal will begin to glow a brighter red, then orange, then yellow and then the tinder will begin to catch the spark and smolder. Pictured below: Blowing on the coal.

When the spark begins to run out into the tinder, hold the tinder bundle out in front of and a little above your face. Turn your head to the side and breathe in. This will keep you from getting a lung full of smoke. Now turn your face back to the smoldering bundle long and steady, not hard, just steady. Turn your head to the side and breathe in. Turn back to the bundle and blow. Be careful because at any moment the tinder bundle will reach critical temperature and burst into flame. When this happens, be ready to pop the blazing tinder into your pre-laid campfire and blow the fire to life. Pictured below: Tinder bursting into flame.